Table of Contents
- Managing storage
- Basic Configuration & Installation
- Managing the linux boot process
- Managing Hardware Under Linux
- Shell scripting
- Configuring Network Settings
- Troubleshooting Network problems
- Understanding Network Security
- Implementing Secured Tunnel Networks
- Virtual Private Networks
- SSH Port Forwarding
- SSH Dynammic Port Forwarding.
- High Availability Networking
- Redundant Networks
- Configure overlay network IP’s ( Legacy )
- Bridging configuration
- Network Bonding
- Bonding modes
- Single Sign ON ( SSO )
- Defending against Network Attacks
- Firwalld Notes and Snippets
- Iptables
- UFW
- nftables
- GPG
- Securing the OS
- Controlling User Access
- Root account configuration
- Sudoers file
- pkexec
- Setting strong passwords
- PAM
- PAM Configuration files
- PAM Continued
- faillock
- Configuring User limits
- Disabling User Login
- Security Auditing using find
- Managing System Logs
- /var/log files
- rsyslogd
- logrotate
- Journald
- Using log files to Detect Intruders
- More on security
- SELinux
- Selinux Modes
- SELinux auditing
- Implementing AppArmor
- Automation and Orchestration
- Virtualization and the Cloud
- Containers
- Troubleshooting
Managing storage
- ext3 is a journaled filesystem , unlike ext2
Basic Configuration & Installation
Time management
-
timedatectl-> command used to configure time and timezones -
/etc/timezone-> file used to change timezones on debian systems -
/usr/share/zoneinfo-> Directory which contains info about timezonesManaging the linux boot process
Show logs from last boot
- logs are stored in /var/log/boot.log
- To store logs from previous boots , create the /var/log/journal directory as root
journalctl -b
BIOS POST phase
System Boot Process :
BIOS: - bootstrap - searches for MBR in bootable devices
GRUB: - bootloader - loads the kernel
Kernel: - Mount root filesystem - Load /sbin/init ( SystemV ) or default.target ( Systemd )
SystemD: - initialize system
MBR
-
First 446 bytes of the MBR contain error codes such as “missing operating system”. Also contains the code for loading GRUB2
-
the next 64 bytes contain the partition table of the drive
-
the last 2 bytes contain the disk signature which contains the /boot directory
-
Boot partitions should be around 100M to 200M in space
PXE ( Preboot Execution Environment )
Client / Server facility used to remotely boot operating systems or provision computer systems from a network server.
Machines are required to have a network card that supports PXE and has a boot device in flash memory
the NIC looks for a DHCP server to receive an address and then provides a location to one or more TFTP servers
UEFI
- Operates in 32 or 64 bit mode
- Can exectue applications prior to the OS loading
- Can read and mount FAT12, FAT16, FAT32 , and VFAT file systems
- Contains network capabilities without the OS being loaded
- Can boot drives larger than 2.1TB
- Allows you to add applicatons to be excuted during the boot process from the UEFI shell
- Supports remote diagnostics and storage backup
- Can be configured using
efibootmgr - If UEFI is implemented , /sys/firmware/efi will exist an efibootmgr will be available
- Provides a connection between the OS and the firmware
- After hardware init , UEFI looks for storage device with and ESP partition
- ESP partitions are FAT32 partitions
- ESP partitions contain bootloader code , applications, and device drivers
- ESP partitions are mounted on
/boot/efi - vendor specific applications or EFI utilities are stored in
/boot/efi - redhat stores efi in
/boot/efi/EFI/redhat - CentOS stores efi in
/boot/efi/EFI/centos - Each OS has it’s own directory in
/boot/efi - Contents of the ESP dictate whether to load a UEFI application , operating system, or automatically load GRUB2
Grub2
Grub notes
- Grub2 starts naming devices at 1 , while legacy grub starts at 0
- main config is located in
/boot/grub2/grub.cfg - default variables for GRUB2 are located in
/etc/default/grub - GRUB2 scripts are located in
/etc/grub.d grub2-install /dev/sdareinstalls config files to the/boot/grub2directory on the first hard drive-
/etc/default/grubfile is used for build the/boot/grub2/grub.cfgfile whengrub2-mkconfigis ran - vmlinuz is the compressed linux kernel that is loaded into de-compressed and loaded into memory during boot
GRUB2 variables
GRUB_TIMEOUT: Boots default entry in n number of seconds if no options are selected.
GRUB_HIDDEN_TIMEOUT: Displays blank or splash screen for a specified number of seconds. After this timeframe expires , the system will begin to boot.
GRUB_DEFAULT: Variable which determines the default OS to boot after GRUB_TIMEOUT expires. This can be a number or menu entry title.
GRUB_SAVED_DEFAULT: Boolean (true/false) which tells GRUB2 to boot the last selected operating system from the menu as the default. This can conflict with GRUB_DEFAULT so you can only use one or the other.
GRUB_DISTRIBUTOR: Used when creating menu titles, sets the name of the OS.
GRUB_CMDLINE_LINUX: Linux kernel parameters
/etc/grub.d scripts
00_header: Loads GRUB2 settings from /etc/default/grub
10_linux: Identifies linux kernels and places them in the menu
30_os_prober: Searches for non-linux operating systems and puts the results in memory
40_custom: Template for custom menu entries
Changing GRUB2 Boot operations
- Make changes by modifying the
/etc/default/grubor the40_customscript in/etc/grub.d - After making changes, run
grub2-mkconfig -i <config-filename> - Always make a backup of
/boot/grub2/grub.cfgbefore making changes - To update grub after making changes , run
grub2-mkconfig -o /boot/grub2/grub.cfgor runupdate-grub2 - Optional but for consistency you can modify the name of the command by running
ln /usr/sbin/update-grub2 /usr/sbin/grub2-update. This makes the command start withgrub2which is common for all grub2 scripts/tools.
Check version of GRUB
grub-install -V
grub2-install -V
Configuration files for GRUB
/boot/grub2/grub.cfg -> replaced /boot/grub/menu.lst as GRUB2’s main config file. This file is created using the grub2-mkconfig command
/etc/default/grub -> contains default variables used when configuring grub2
/etc/grub.d/ -> Contains grub2 scripts
Boot grub into single user mode
- Change the
linux64orlinuxGRUB2 setting by adding “systemd.boot=rescue.target” - Or at the end of the
rooption , in thelinuxorlinux16line , change to the options listed below
rw init=/sysroot/bin/sh
- Then press Ctrl+x to start the system into shell mode, shell mode doesn’t ask for root password
If the system is using SysV , you can add the single to the end of the command line arguments after linux16 see below.
linux16 /vmlinuz-3.10.0-957.el7.x86_64 root=/dev/mapper/rhel-root ro crashkernel=auto single
Change forgotten root password
- Press
Escwhen the GRUB2 menu appears - Press
eto edit the default linux options which will open the GRUB2 boot script for that specific menu entry - Locate the
rooption in thelinuxorlinux16line and change torw init=/sysroot/bin/sh. If you’re on a Systemd system modify thelinux64orlinuxGRUB2 setting by addingsystemd.boot=rescue.target. - Press
Ctrl+xto start the system into shell mode. Which is similar to emergency mode except it doesn’t ask for a root password - Once you’ve reached the shell , run the following commands below to change the root password
chroot /sysroot
passwd root
touch /.autorelabel # Tells selinux to update new settings
exit
logout or /sbin/reboot -f
Systemctl
Get default target
systemctl get-default
List Failed units
systemctl list-units --state=failed
The Kernel Initialization Phase
- Bootloader loads vmlinux ( system kernel )
- Bootloader then loads the initial RAM filesystem
initramfs - GRUB2 then loads the compressed linux kernel
vmlinuz - Then the kernel decompresses and mounts initrd or initramfs
- the RAM filesystem contains kernel modules and apps needed to boot the operating system
- initrd.img and initramfs.img are created from mkinitrd
- mkinitrd uses dracut to generate ram disk files
- Kernel then initializes memory and configures attached hardware using drivers found in initrd
- After the drivers are loaded , the kernel mounts the filesystem in read-write mode and begins the OS initialization.
System V init
- Once the kernel is running , initrd is unmounted and the init process starts the system scheduler
- The system scheduler is assigned the PID of 0. The first process on the system
- The init process is the last step in booting.
/sbin/initis started which is assigned the PID of 1./sbin/initreads the/etc/inittabconfiguration file- You can use the
initcommand to change runlevels - Use the
runlevelcommand to find out which level you are on currently
SystemV Run levels
- 0 - halt the system ( poweroff.target)
- 1 - single user ( rescue.target )
- 3 - multiuser server ( multi-user.target )
- 4 - not used ( user customizable )
- 5 - graphics mode ( graphical.target )
- 6 - reboot ( reboot.target )
emergency.target :q
Shutting down the system
init 0 - halts the system init 6 - set runlevel to 6 , rebooting the system and setting runlevel to default halt - Shuts down the system reboot - Reboots system reboot -f /sbin/reboot -f
The shutdown command allows you to shutdown the system at a specific time.
The syntax for the command is shown below
shutdown +m -h|-r <message>
-
+m: specifies time in minutes when the system should go down. Can also be replaced with thenowkeyword which will shutdown the system instantly. You can also replace this with a time in the format ofhh:mm -
-h: specifies that the system should be halted instead of shutting down -
-r: specifies that the system should be rebooted. -
<message>: text message that will be displayed to other users on the system, alerting them of the shutdown -
To cancel a shutdown , use the
shutdown -ccommand in the prompt -
You can also use the
wallcommand to send messages to users about system events. You must send the message to thestdinof the wall command. See the example below.
echo "KNOCK KNOCK SYSTEM SHOCK" | wall
Kernel panic
- Protective measure to prevent data loss / corruption when an unrecoverable error is encountered
- Can be caused by configuration or software issues : missing, misconfigured, failed hardware , failed hardware drivers , system resource problems
kexec,kdump,crashare utilities used for storing logs and troubleshooting kernel panics. These tools may not be installed by defaultkdumpsaves logs to memory and can even send the logs to a remote machine- during the boot process memory is reserved for logs
kdumpgenerates. - This process is set by the
crashkerneldirective on the GRUB command line - The specific size of memory reserved is dependent on the type of hardware and to the total system memory available.
- You can change the allocation size of the
crashkerneldirective in the - The
kexecboots the kernel from another kernel but does not use BIOS to preserve the system state and allow you to analyze the crash dump datausing thecrashcommand.
Managing Hardware Under Linux
- Only topics “Discovering Devices” and “Managing Kernel Modules” are covered on the exam
Discovering Devices
- Discovery starts during the boot process with searching through system busses for devices.
- When a device is found , it’s properties are discovered and named so applications can access the device.
- Bus is a system device used to transfer data between devices
- Ports are physical connections to a Bus
- Devices are system components capable of receiving or providing data
- Drivers are files or groups of files used to control a hardware device
- The kernel ring buffer can be displayed with
dmesg - USB detection with
lsusb - PCI detection with
lspci
Displaying the Kernel Ring Buffer with dmesg
- Kernel ring buffer is a cyclical storage space containing kernel log messages.
- Once all data reserved is used , data is overwritten starting from the beginning of the buffer.
- Data from the ring buffer is handled by syslog
- dmesg use term “level” to describe syslog prio
Syslog facilities & syslog Priorities
Left side is facilities , right is priorities or “levels”.
- kern -> emerg
- user -> alert
- mail -> crit
- daemon -> err
- auth -> warn
- syslog -> notice
- lpr -> info
- news -> debug
dmesg
dmest -T -f <FACILITY> -l <PRIO-LEVEL>
-T-> timestamp-f-> syslog facility option
Other options include-L-> adds color to outputH-> Human readable output
Search for USB events
dmesg | grep usb
lsusb
- Allows you to list all available USB devices
- Scans for USB busses
- uses udev hardware DB to associated human readable name to vendor ID and product ID
lsusbwill tell about the USB hub , driver , and transfer speed- transfer is in megabits
- man page is the best reference for options
- Transfer speeds of
12Mindicate USB1.0 - Transfer speeds of
480Mindicate USB2.0 - Transfer speeds of
5000Mindicate USB3.0 - Transfer speeds of
10000Mindicate USB3.1 Gen 2(USB3.2 Gen 2x2) - Transfer speeds of
20000Mindicate USB3.2 - The output of the ID’s are in the format
<manufacturer:device_id> - Table of known manufacturer and device ID’s can be found at http://www.linux-usb.org/usb.ids
/dev/bus/usb/-> location for USB device files and contains a directory for each Bus,- In each directory for a USB Bus, there are device files for each Device
- File of known USB ID’s are stored in
/usr/share/hwdata/usb.ids
View info based on bus number and device number
lsusb -D /dev/bus/usb/<bus_number>/<device_number>
The output to this command is similar to the output of lsusb -v
The USB Root Hub
- First USB device on a linux system.
- responsible for communicating with devices attached to hub ports and the hub controller.
- The hub controller monitors removed and newly added devices
- manages power for devices on host ports
- manages communication on the controllers bus.
lspci
- Peripheral Component Interconnect
- supports 32-bit or 64-bit addressing
- supports ultra DMA burst mode for PATA.
- can auto detect PCI peripheral boards
- multiple PCI busses can be joined using bridges
- 256 busses max per system
- Larger systems use domains if more than 256 is needed
- Each bus can host up to 32 devices
- PCI bus hierarchy starts at bus(0)
Bus:Device:Function Class Vendor name-> Format of output fromlspcilspci -D-> displays domain number inDomain:Bus:Device:Functionformat- without
-Ddomain is assumed to be 0000. - File of known USB ID’s are stored in
/usr/share/hwdata/pci.ids lspci -vv-> displays additional bus informationlspci -t-> displays tree- In the output of
lspci -vyou can see the class ID’s for each device in the format of<vendor:device>
Host Bus Adapter (HBA)
- Used to connect multiple devies using a single controller
- Examples of host adapters : IDE , SCSI, SATA , iSCSI, Fiber channel, Network Controllers
lspci -nn | grep -i hba-> Shows HBA adapterssystool -c <adapter-class>-> Needssysfsutilsinstalled- You can also view HBA adapter info in
/sys/class
Managing Kernel Modules
-
lsmod-> Lists all currently loaded kernel modules -
lsmodpulls data from/proc/modulesand outputs in human-readble format -
To blacklist kernel modules, add them to the
/etc/modprobe.d/blacklist.conffile -
echo "blacklist joydev" >> /etc/modprobe.d/blacklist.conf-> Blacklistsjoydevkernel module -
modinfo <module-name>-> View info about loaded module -
depmod-> Used to build dependency file to load kernel modules -
depmodBuilds a file namedmodules.depand stores in/lib/modules/<kernel_version>/ -
ls /lib/modules/$(uname -r)-> lists kernel modules for current linux kernel version being used. -
modules.dep-> file that shows dependencies between kernel modules -
This file also helps kernel utilities ensure dependent modules are loaded.
-
Once the
modules.depfile is generated , you can useinsmodto load the module -
insmod <module_filename> -
<module_filename-> Module file located in/lib/modules/<kernel_version>/kernel -
insmodDoesn’t install module dependencies found bydepmod -
modprobe-> Preferred Alternative toinsmod, loads kernel module dependencies by default -
modprobe <module_name>-> Loads kernel module -
modules loaded with
modprobeare not persistent after restarts -
modprobe is run every time the kernel loads to automatically detect devices
-
/etc/modprobe.d/*.conf-> Files that determine which kernel modules are loaded at startup -
rmmod <module_name>-> Unloads a kernel module , will not work if device using the module is in use. -
rmmoddoes not take dependencies into account -
modprobe -r <module_name>-> unloads module and takes dependencies into account
Modprobe directives
These are lines you can add into your /etc/modprobe.d/*.conf files to manage kernel modules during startup
-
install <module-name>-> tellsmodprobeto load specified module -
alias <alias_name> <module_name>-> alias which can be referenced from shell prompt -
options <module_name> options-> List of options for the<module_name>. examples areirq=andio=which are used when the module loads
Finding block devices
lshw -short -class volume
ls -l /sys/block
lshw -short -class volume
Shell scripting
Highlights
-
exit 0-> 0 means success -
PATH=$PATH:.-> sets path to current working directory, this poses a security risk as hackers could place malicious applications with similar names as common util scriptspasswdfor examples, in your current directory. -
cat /etc/shells or chsh -l-> outputs list of available command line interpreters -
Interpreter is defined by login account.
-
Strings defined in Integer variables are assigned the value of 0
Globbing Wildcard Characters
- Allows you to filter for different output based on patterns , very similar to regex
Wildcards
* -> matches any one character , or the beginning character
? -> matches any single character after the expression
[ahp] -> Matches single character between the brackets
[D-H] -> Matches single character within the range
Globbing snippets
ls [nf]*0
Only lists files that start with n or f , and end with zero.
ls f*1
Only files that start with f and end with 1.
ls ????
Only lists files with 4 characters
touch file note {file,note}{0..20}
Generates 20 files with filenames matching file0..file20 and note0..note20.
Sequencing
|| -> runs command if previous command fails
&& -> runs command if previous command was successful
; -> runs next command regardless of success or failure
echo $? -> retrieves the exit code of the last command run
- Unsuccessful programs send exit code of 1
Command substitution
-
`command` usable
-
$()-> usable
Examples
ls /lib/modules/$(uname -r)
Outputs the kernel modules directory with a substituted command that retrieves the kernel version.
echo "Current time : `date +%m/%d/%y" "%R`"
Outputs the time with the current date in 24-hour time.
Variables
-
Can use the
declare -pcommand to print out the attributes of a defined variable -
declare -i <variable_name>=<value>-> declares integer variable -
Output of
declareis in the format oftypset -<type> <var_name>=<value>
Reading user input
read-> command used to read user input- If no variable argument is supplied, the response from the user is stored in the variable REPLY
Positional parameters
-
Command line arguments can be referenced in the order they are sent , see examples below
-
$0-> Name of command or script -
$#-> number of command line arguments -
$*-> list of command line arguments -
$$-> Current process PID -
$!-> PID of last background job -
$?-> Command exit status code
Examples
#!/bin/bash
echo "$1"
File testing operators
-
-a or -e Does the file exist? [ -a /root/George ]
-
-s Is the file size greater than 0? [ -s /etc/bashrc ]
-
-f Is the file a text file? [ -f /etc/bashrc ]
-
-d Is the file a directory? [ -d /etc ]
-
-b Is the file a block device? [ -b /dev/sda ]
-
-c Is the file a character device? [ -c /dev/tty1 ]
-
-p Is the file a named pipe? [ -p /run/dmeventd-client ]
-
-L or -h Is the file a symbolic link?
-
-r Does the file have read permissions for the user executing the test?
-
-w Does the file have write permissions for the user executing the test? -x Does the file have execute permissions for the user executing the test?
-
-u Does the file have SUID applied?
-
-g Does the file have SGID applied?
-
-k Does the file have sticky bit applied?
-
-O
Is the file owned by the user specified by the argument ? -
-G
Is the file owned by the user specified by the argument ?
Testing conditionals
-
In bash , the
teststatement can be used to test conditions -
test <expression>-> syntax
Examples
test $EUID -eq 0; echo
Functions
- Function paramater arguments are referenced the same way command line arguments are for example
$1
function function_name(){
}
Text processing
Configuring Network Settings
-
FTP listens on port 20 ( data transfer ) and 21 ( control connection )
-
Ports range from 0-65536 , host ephemeral ports
-
Reserved ports range from 0-1023 , well known ports
-
ICANN reserves ports 1024-49151, special purposes for orgs
-
Dynamic ports are 49152-65535, used for any network service
-
/etc/services-> List of default ports used for services
Known ports
-
Ports 20 and 21: FTP
-
Port 22: Secure Shell (SSH, SCP, SFTP, STelnet)
-
Port 23: Telnet
-
Port 25: SMTP
-
Port 53: DNS
-
Port 80: HTTP
-
Port 110: POP3
-
Port 123: NTP (time synchronization)
-
Ports 137, 138, and 139: NetBIOS
-
Port 143: IMAP
-
Port 389: LDAP
-
Port 443: HTTPS
-
Port 514: Syslog remote logging
IP classes
-
Class A : 126 possible networks 16.7 million possible addresses , first octet must be between 1-126
-
Class B : 16,384 possible networks , 65,534 possible hosts
-
Class C : values of 192-223 , 2,097,152 possible networks , 254 hosts per network.
-
To calculate number of hosts per network , the zeroes in the subnet as “Z” use this formula
N = 2^Z - 2
-
Subnet mask CIDR notation integers represent the total 1-bits used for the subnet mask
-
If you’re given the CIDR notation , use the formula below
N = 2^(32-CIDR) - 2
Configuring Network Addressing Parameters
-
Onboard network adapter is assigned an index number provided by the BIOS
-
ethtool-> allows you to list and alter NIC settings
Network Config Snippets And Commands
Ip commands
-
ip addr add <ip> dev <device>-> Adds IP to existing network interface -
ip addr del <ip> dev <device>-> Removes IP from existing network interface -
ip link set <interface> down-> Disables network interface -
ip link set <interface> up-> Enables network interface -
ip addr flush dev <interface-> Resets changes -
ip route change-> Change route -
ip route flush cache-> updates routing table with new changes. Flushes routing table -
ip route show-> Shows route table info
Systemctl network related commands
-
systemctl restart network-> Restarts network interfaces on Red hat systems -
systemctl restart networking-> Restarts network interfaces on debian systems -
ip link-> Shows MAC addresses , L2 info -
ip route-> Shows configured L3 routes, default gateways -
/etc/sysconfig/network-scripts/ifcfg-<interface>/-> Location of network interface configuration file -
/etc/network/interfaces-> Network interface configuration on debian systems
route commands
route commands
-
route-> shows kernel IP routing table , stored in RAM -
route add -host <ip> reject-> Create route to prevent traffic from reaching<ip>
Interface configuration
Add these changes to the config file in the
/etc/sysconfig/network-scripts/ifcfg-<interface>file.
To configure DHCP
- IPADDR , NETMASK , NETWORK, BROADCAST are not required if using DHCP
BOOTPROTO='dhcp'
NAME='<name>'
NETMASK=''
NETWORK=''
FreeBSD Network Interface Configuration
-
/etc/rc.conf-> Config file for interfaces -
sudo service netif restart-> restarts networking service -
sudo service routing restart-> restarts routing service.
Config file syntax
hostname="trueNAS"
ifconfig_vtnet1="inet 192.168.x.x netmask 255.255.255.0"
defaultrouter="192.168.x.1"
This configures the vtnet0 interface with a static IP and a persistent default route.
DHCP
-
/etc/hostname -> config file for hostname , can be made persistent through using
hostnamectl set-hostname <hostname> -
/etc/dhcpd.conf -> Config file for DHCP , including the lease time.
-
In /etc/dhcpd.conf , modify
max-lease-timeto get shorter or longer lease times. -
If DHCP server cannot be reached , run
dhclient <interface> -vto retrieve IP
Nmcli
-
nmcli con show <interface>-> shows info about specified interface -
nmcli con modify <interface> +ipv4.addresses <ip_addr>/<CIDR>-> adds new IPv4 address to interface. -
nmcli con modify <interface> -ipv4.addresses <ip_addr>/<CIDR>-> removes IPv4 address on interface. -
nmcli con up <interface>-> brings up network interface
Routing
-
route add -net <network_address> netmask <netmask> gw <router_address>-> adds new L3 route -
route add -net <network_address> netmask <netmask> gw <router_address>-> removes L3 route -
route add default gw <ip>-> adds default route - Changes made with
routeandip routeare not persistent after reboot -
ip route add <ip>/<CIDR> via <router_addr> dev <interface>-> adds route ip route del <ip>/<CIDR>-> deletes route
DNS
-
/etc/hosts-> first file used for name resolution. -
DNS is only used if record for the domain is not in the
/etc/hostsfile. -
<IP_address> <host_name> <alias>-> Syntax for/etc/hostsfile. -
A dns server is authoritive if it contains a record for the requested domain in it’s DB of name mappings.
-
DNS servers cache previously resolved domains for a period of time so they can respond directly to the client than repeat the resolution process.
-
/etc/resolv.conf-> configuration file which specifies DNS servers to be used -
There are two keywords used in the
/etc/resolv.conffile ,searchandnameserver -
search-> entry which specifies how to handle imcomplete domain names -
nameserver-> entry which specifies IP for DNS server -
/etc/nsswitch.conf-> defines the order of which services will be used for name resolution
DNS process
-
Client sends DNS request to DNS server on port 53. If server is authoritive , the IP of the domain is sent to the host. If not , continue to step 2.
-
DNS server sends request to root level DNS server, which are able to resolve top level domains like .gov , .com , .edu etc.
-
DNS server sends IP of domain to host , which then contacted using this IP
/etc/nsswitch.conf
file determines priority and method for which services are used for name resolution.
hosts:     files dns
networks:  files dns
These two lines dictate that the /etc/hosts file will be consulted first , afterwards /etc/resolv.conf will be consulted for name resolution.
IPv6
-
uses 128-bit addresses
-
8 4-character hexadecimal number make up each of the hextets
-
Zeroe’s in the addresses can be abbreviated , but a hextet of
0000can only be abbreviated once. -
IPv6 uses DHCPv6
-
each hextet can be represented between 0-FFFF.
Troubleshooting Network problems
Ping
If you can ping another host and receive a timely response you know 3 things.
-
The network interface is working correctly
-
The destination system is up and working correctly
-
The network hardware on both ends is working correctly
Netstat
-
can be used to list network connections
-
Can display the routing table
-
Can display info about the network interface
-
Has been replaced by
ssor “show sockets”
Nestat snippets
-
netstat -a-> lists all listening and nonlistening sockets -
netstat -i-> display statistics for network interface -
netstat -r-> displays routing table
nc
-
nc -l 2388-> opens listening socket on port 2388 -
nc 192.168.3.104 2388-> initiates connection to IP on port 2388.
Network based filesystems
-
showmount -e system5-> lists possible shares on “server5” server that’s available to clients -
mount -t nfs <hostname>:/<share_name> /mnt/<mount_dir>-> mounts the<share_name>share on/mnt/<mount_dir>. -
Nfs has a feature called automounting which automatically remounts the shared filesystem once it’s availble.
samba
-
smbd -V-> outputs SMB version ( not proto version for clients ). -
/etc/local/smb4.conf-> config file on TrueNAS for SMB. -
/conf/base/etc/local/smb4.conf-> global base config file for SMB -
grep "server min protocol" /etc/local/smb4.conf-> Command to find minimum SMB version used by clients. -
smbclient -L <server_hostname> -U <username>-> view shared filesystems -
mount -t cifs -o //192.168.x.x/Share /mnt/point -o username=<username>,...,password=<password> ...-> command to mount smb share
Understanding Network Security
Symmetric Encryption
-
Single private key
-
Same key used for encryption and de-cryption
-
Both sender and receiver must have exact same key
-
Examples : Blowfish , 3DES , AES
-
Also called “Secret Key Encryption”
Asymmetric Encryption
-
Uses 2 keys , public & private
-
The public key is known to everyone , while the private key is only known to the owner
-
Public key is used for encryption
-
Private key is used for decryption
-
Data is signed with the public key
-
Data is verified with the private key
-
Examples : RSA , DSA , Diffie-Hellman
-
You can use the senders public key to verify the data did come from the actual sender
-
Data is sent with the users private key
-
Very difficult to break
-
Commonly used in online shopping to hide users payment info or social security number.
-
Certificate Authorities are used to verify a website is legit
-
Examples: Verisign , Entrust, DigiCert
-
Verifies site is not a spoofed site
-
PKI: Public Key infrastructure
-
PII: Personally Identifiable Information
-
Some examples of PII are: Account numbers, Residential Addresses, Tax identification numbers.
-
PII is encrypted with SSL ( Secure Sockets Layer) / TLS ( Transport Layer Security )
-
When you see a lock on a webpage you are visiting , this indicates the site is being accessed through HTTPS. Which uses Transport Layer Security ( TLS ) or formerly ( Secure Sockets Layer ).
-
openssl s_client -connect mysite.com:443-> command which retrieves info on hashing algorithms or digital certificates being used by the site. Also verifies that it’s using either SSL/TLS to begin with. -
Admins can mint their own certs which can be used to encrypt both network transmissions and files in the filesystem. These certificates are called “self-signed certificates”
-
Wildcard certificates can be a cost effective way to sign certificates for both domains and subdomains
-
For example a wildcard certificate for “suss.com” can be used for “cap.suss.com” and “amogus.suss.com”
Integrity Checking Via Hashing
-
Used to verify a file that has not been altered
-
One way encryption or hashing is used
-
File integrity checking is done by ensuring the downloaded files hash matches the vendors hash
-
MD5 & SHA are the two most popular tools
-
Use
md5sumto output the MD5 hash of a file -
SHA-256 is less likely to produce the same hash for two different files , also called a collision
-
If the hash differs from the vendors , this may indicate the file is only a partial download or infected with malware ( altered )
-
sha256sum-> command to output SHA-256 hash of a file. -
sha1sum-> command to output SHA hash of a file. -
sha512sum-> command to output SHA hash of a file.
Implementing Secured Tunnel Networks
- older tools which lacked encryption and no longer used on public networks
-
telnet
-
rlogin
-
rsh
-
rcp or FTP
-
Chapter highlights
-
sshd -> ssh daemon
-
ssh -> ssh client used to connect to SSH server
-
scp -> secure copy files between systems
-
sftp -> secure copy , imitates FTP
-
slogin -> LIke SSH , access shell prompt remotely
-
ssh-keygen -> used to create users public / private keys. Also makes self signed certificates
-
ssh uses both asymmetric and symmetric encryption
-
The privelleged port for ssh is defined in the
/etc/servicesfile. -
ssh -l <username> <server-ip> [OPTIONS] /sbin/ip addr-> runs a command on a remote system through ssh. -
scp file.txt <user-name>@<ip-or-hostname-of-server>:/install/dir-> Syntax for scp -
sftp <username>@<ip-or-hostame>-> sftp syntax -
get /file/on/server /host/dir-> sftp CLI syntax -
rsync-> backup tool which uploads file updates rather than duplicates. Uses SSH to encrypt data transfers -
rsync -av /file/dir/* user@remote:/filedir-> Syntax template for syncing the contents of a directory to a remote machine using SSH.
Key locations
-
/etc/ssh/ssh_host_key-> SSH server private key. Should never be shared. -
/etc/ssh/ssh_host_key.pub-> SSH server public key. Given to clients -
/etc/ssh/ssh_known_hosts-> Client Public keys for SSH servers. -
~/.ssh/known_hosts-> Public keys for SSH clients that have connected to the system. Located in users home dir. Can be added when connecting to host server -
/etc/ssh/id_rsa-> SSH Clients private key using RSA encryption . -
/etc/ssh/id_rsa.pub-> SSH Clients public key using RSA encryption . -
~/.ssh/authorized_keys-> File on Client which contains authorized public keys for various SSH servers such asid_rsa.puband similar keys. Stored in users home directory on client machine.
SSH connection process
-
SSH client creates connection to SSH server. The SSH server is assumed to be listening on Port 22.
-
SSH server sends public key to client
-
Client receives public key and checks if it already has a copy of the servers public key.
-
If the Client does not have public key from the server in either
/etc/ssh/ssh_known_hostsor~/.ssh/known_hosts. The user client is prompted to add it. -
After the public key from the server is found or added , the client now trusts the remote system and generates the symmetric key.
-
Client then uses the servers public key to encrypt the new secret key and sends it to the server.
-
The server descrypts the symmetric key using it’s own private key. The result of this is now both systems now have the same secret key.
-
Now that both the client and server have the same secret key , they can now use faster asymmetric encryption during the rest of the SSH session.
-
The user is then prompted to login securely now that everything the user types is sent in an encrypted format.
-
After the secure channel is negotiated , and the user has been authenticated. Data can now be sent securely.
Configuring SSH
-
openssh package is required , includes the sshd daemon and ssh client.
-
/etc/ssh/sshd_config-> config file for ssh servers -
/etc/ssh/ssh_configor~/.ssh/config-> Config file for ssh clients
Server configuration options
-
AllowUsers -> Restricts login to specified users , space separated list
-
DenyUsers -> Opposite of AllowUsers , space separated list.
-
PermitRootLogin -> Yes or no value which allows or disallows the root user to authenticate through ssh server
Client configuration options
-
Port -> Port used by server to connect through.
-
User -> Specified user to authenticate as.
-
/etc/ssh/ssh_configapplies to all users, can be overridden by~/.ssh/configfor a specific user - Can also configure ssh client options through ssh command line options
-
If no user is specified in command line arguments like
-l, the system will try to authenticate as $USER. - Type
exitto terminate the connection
Logging into SSH without a password
-
Token based authentication
-
Use
ssh-copy-idto copy the clients public key to the/etc/authorized_keyson the servers filesystem. -
ssh-keygen-> command used to create public/private keys on client system.
Public key authentication setup
Step by step process
-
On client , use
ssh-keygen -t [rsa,dsa]to create keys. Could use both , RSA for encryption and DSA for decryption. -
Use default directory for storing keys ,
~/.ssh/id_rsaand~/.ssh/id_dsa. -
Assign passphrase to the key , making the key useless if the passphrase is not known to an attacker.
-
Securely copy key to server using the command in step 5.
-
scp ~/.ssh/<keyname>.pub user@remote:/filename -
Then append contents of public key to
~/.ssh/authorized_keysfile on the server. -
To avoid entering the passphrase everytime you authenticate with the server, use the
ssh-agentcommand which caches the key passphrase with thessh-addcommand. This passphrase is cached in memory. -
You can also use
ssh-copy-idwhich will automatically add the public key to the servers~/.ssh/authorized_keysfile
Virtual Private Networks
-
Allows users to connect to remote servers over untrusted networks.
-
Encryption and tunneling protocols are used.
-
IPSec -> tunneling protocol
-
DTLS -> Datagram Transport Layer Security.
-
VPN’s can be used for workers at home to connect to the office’s network securly over an untrusted public network.
-
Types of VPN’s -> SSH , SSL( Not really SSL , Uses TLS but the term stayed the same )
-
SSL VPN’s use TLS for encryption
-
If VPN settings are correct but the system won’t connect , check firewall rules and make sure the ports used are open.
SSH Port Forwarding
-
Allows tunneling of unencrypted services over encrypted SSH channel.
-
Example: Accessing web server in DMZ via a jump server
-
An SSH jumpserver is a hardened server with intrusion detection that serves protocols running in a DMZ more efficiently.
-
The
-Loption insshcommand allows you to connect through a jump server and forward requests to the intended destination. -
ssh -L 80:web.server.com:80 jump.server.com-> connects to SSH jump server which then forwards requests to web server.
SSH Dynammic Port Forwarding.
-
Allows forwarding requests to a server through an SSH proxy. Which would use an encrypted SSH connection.
-
For example , you can use this to forward requests to a web server through an encrypted SSH connection. Using the command below
-
ssh -D 55555 shah@ssh.server.com-> Opens proxy on local machine which forwards requests to a web server using port 55555.
High Availability Networking
-
Network bridging can enhance availability. Converts local LAN adapter.
-
Dual homes two or more netowrks for fault tolerance.
-
Bonding dual-homes network segments to boost network throughput.
Redundant Networks
-
Network Bridge Control -> bridge two networks together ( fault tolerance )
-
Network Bonding -> Bond network segments ( Boost throughput )
-
Overlay networks allow admins to configure mutliple L3 addresses to a local network card. Making it act like act like multiple network cards.
-
On both debian and centos systems , install the “net-tools” and “bridge-utils” packages.
-
On centos systems, make sure to install the “epel-release” package.
Configure overlay network IP’s ( Legacy )
Please note that these are legacy methods, nmcli and ip have replaced ifconfig and therefore do not use the older aliases e.g “eth0:0” , current tools list the newly added IP’s under the interface rather than use aliases for each.
ifconfig <interface> inet <ip-address>/<CIDR>
ifconfig eth0:0 inet 192.168.2.2/24
ifconfig eth0:1 inet 192.168.4.2/24
ifconfig eth0:2 inet 192.168.5.2/24
Bridging configuration
-
brctl-> base command to configure bridging , is installed withbridge-utilspackage. -
brctl addbr <name>-> create bridge and assign name -
brctl addif <bridge-name> <interface>-> Adds interface to network bridge, can add overlay network IP. -
ip link set <bridge-name> up-> enables bridge
Steps to create and add a bridge for two hosts
On host 1
-
ifconfig eth0:0 inet 192.168.2.2/24 -
brctl addbr br0 -
brctl addif br0 eth0:0 -
ip link set br0 up -
ping 192.168.2.3
On host 2
-
ifconfig eth0:0 inet 192.168.2.3/24 -
brctl addbr br0 -
brctl addif br0 eth0:0 -
ip link set br0 up -
ping 192.168.2.2
Network Bonding
-
/etc/sysconfig/network-scripts/ifcfg-bond0-> script for defining interface bond -
Make sure to add these parameters below to configure the bond
MASTER=bond0
SLAVE=yes
Bond Interface configuration
DEVICE=bond0
NAME=bond0
TYPE=Bond
BONDING_MASTER=yes
IPADDR=x.x.x.x
PREFIX=24
ONBOOT=yes
BOOTPROTO=none
BONDING_OPTS="mode=1 miimon=100"
Bonding modes
-
Round-Robin -> 0, Packets are sent in order across all NIC’s , default
-
Active-Passive -> 1 , One NIC sleeps and activates if another fails
-
Aggregation -> 4, NIC’s act as one , resulting in higher throughput
-
Load-balancing -> 5, Traffic is equally balanced over all NIC’s
Single Sign ON ( SSO )
- Uses one-time passwords
RADIUS
-
RADIUS -> Remote Authentication Dial-In service
-
RADIUS authentication is done by a central server
-
Once a user authenticates , they are granted an IP and access to the network
-
RADIUS uses ports 1812/udp , 1813/udp
LDAP
-
LDAP -> Open source active directory
-
LDAP uses the X.500 standard
-
LDAPv3 uses TLS
-
LDAP uses ports 389 , 636 if using TLS
Kerberos
-
Kerberos -> Preferred on public networks
-
No passwords , encrypted or otherwise are sent across the network
-
Kerberos uses tickets which expire after a set time.
-
Time must by synced between clients/servers to work.
-
Kerberos uses port 88
-
kinit <username>@<hostname>-> starts kerberos session -
kinit -a-> View addresses associated with current kerberos tickets -
kinit -v-> details on tickets, length , expiration times , renewal times.
TACACS+
-
TACACS+ -> combines auth , authorization , and accounting
-
Entire transaction is encrypted
-
Can be placed on 3 different servers
-
not compatible with older versions
-
Uses TCP port 49 ,
-
originally designed for Cisco
Defending against Network Attacks
-
Disabling unused services
-
Installing security updates
-
systemctl list-unit-files-> list each service and status -
chkconfig <service> off-> legacy tool used for disabling services -
netstat -l-> shows listening ports -
lsof -i-> lists network services and their ports -
Firewalls filter incoming and outgoing traffic between private and public networks
-
Firewalls compare the origin address, origin port, destination address, destination port, type of packet, and protocol used against an Access Control List ( ACL ) to decide whether to forward or drop the traffic.
-
Packet filtering firewalls are stateless, they do not know the state of the connection.
-
Stateful firwalls maintain state of connection , commonly used.
-
echo 1 > /proc/sys/net/ipv4/ip_forward-> enables Ipv4 port forwarding -
echo 1 > /proc/sys/net/ipv6/ip_forward-> enables Ipv4 port forwarding -
echo 1 > /proc/sys/net/ipv6/conf/all/forwarding-> enables forwarding for all network interfaces on system
Firwalld Notes and Snippets
-
firewall-cmd --get-default-zone-> gets default zone -
firewall-cmd --set-default-zone=internal-> sets default zone -
firewall-cmd --list-all -
Review firewall-cmd zones in book , page 508
Iptables
-
netfilter -> used by kernel to filter packets
-
chain -> firewall rule for incoming packets
-
Filter table -> used for creating packet filtering rules
-
iptables can add, delete , insert , append rules
-
First rule in chain is labeled “1”
-
iptables -t <table> <command> <chain> <options>-> iptables syntax iptables -t <table> -A <policy> -j <policy>-> Syntax to add rules to a chain-
iptables -L-> list all rules in chain -
iptables -N <chain_name>-> Create new chain -
iptables -I <chain_name>-> Inserts rule in chain -
iptables -R <chain_name> <rule-num>-> Replaces rule in chain , first rule is 1. -
iptables -D <chain_name>-> Deletes rule in chain -
iptables -F <chain_name>-> Deletes all rules in chain -
iptables -P <chain_name>-> Sets dfault policy for chain -
iptables -p-> specifies protocol , can use “all”, “tcp”, “udp”, “icmp” -
iptables -s <ip/mask>-> specify source address -
iptables -s 0/0-> Checks all source addresses -
iptables -d <ip/mask>-> specify destination address -
iptables -d 0/0-> Checks all destination addresses -
iptables -j <target>-> tells iptables what to do when packet matches a rule , ACCEPT, REJECT, DROP, LOG -
iptables -i <interface>-> Specifies interface where packet is received. Only applies to INPUT and FORWARD chains. -
iptables -o <interface>-> Specifies interface where packet is to be sent , only applies to OUTPUT and FORWARD chains -
iptables-save-> save changes to firewall tables -
iptables-restore-> resotre tables from file created -
iptables -D FORWARD 1-> Delete first rule in FORWARD chain -
iptables -t filter -F-> deletes all rules from filter table -
iptables -P INPUT DROP-> Sets default policy for INPUT chain to DROP all incoming packets -
iptables -P FORWARD DROP-> Sets default policy for FORWARD chain to drop all forwarded packets -
iptables -A INPUT -s 0/0 -p icmp -j DROP-> Appens rule to chain for all incoming ICMP packets for any address to be dropped. Tl;dr all incoming ICMP packets from any address are dropped. -
iptables -A INPUT -i eth0 -s 192.168.2.0/24 -j DROP-> Appends rule to INPUT chain which drops packets received on the eth0 interface from any address on the 192.168.2.0/24 subnet. -
iptables -L -nvx-> View counters on all chains -
iptables -A INPUT -p icmp -j LOG --log-prefix="[DROPPED]" --log-level=7-> creates a rule for inbound packets , logs all icmp traffic into the kernel debug logs. - Loggging from IPtables is stored in the kernel logs by default
Redirect HTTP traffic to proxy to new port / destination
iptables -t nat -A PREROUTING -p tcp --dport 80 -j DNAT --to-destination <ip>:<port>
Default chains ( rules )
-
FORWARD: For packets being routed through the box
-
INPUT: For packets destined to local sockets
-
OUTPUT: For locally generated packets
Each chain has 4 policies
-
ACCEPT
-
DROP
-
QUEUE
-
REJECT
Default Tables with chains
Filter -> INPUT , FORWARD
UFW
/etc/ufw-> location for before.rules and after.rules files which define firewall rules.
nftables
- made to improve performance issues with iptables
nftables snippets
-
iptables-translate-> tool to translate iptables rules into nftables rules. -
nft add rule ip filter INPUT tcp dport 22 ct state new,established counter accept-> allow ssh -
nft add rule ip filter INPUT ip protocol tcp dport {80,443} ct state new,established counter accept-> allows HTTP & HTTPS traffic
GPG
-
Gnu Privacy Guard , open source version of OpenPGP
-
~/.gnupg-> local directory , stores user keys and config file. -
gpg --gen-key-> generates key -
secring.gpg -> secret key
-
pubring.gpg -> public key
-
trustdb.gpg -> GPG trust database o
Securing the OS
-
nohup <command> &-> command that specifies a process to ignore any hangup signals it receives , such as a user logging out. -
find -name named &-> finds command loaded withnohup -
Disabling USB ports , protects data.
-
rm /lib/modules/$(uname -r)/kernel/drivers/usb/storage/usb-storage.ko.xz-> Disables USB ports by removing USB driver. -
Perform security scans
-
Disable FTP and Telnet ( unencrypted communication protocols )
-
Remove unused packages and applications
-
Use host firewalls , UFW , firewalld
-
Secure service accounts with
nologinenabled in/etc/passwd
Controlling User Access
-
Password attempts -> Lockout
-
Failed auth -> Lockout
-
User limits
-
Disabling user login
-
Security auditing using
find
Root account configuration
-
pkexec
-
only use root when absolutely necessary
-
su -> substitute user
-
su <options> <user-account> -
su --> loads target users profile. -
su -c-> temporarily switches to target users account , runs command , and returns to original account -
su -c "echo 'hello'" ryan-> example , runs echo “hello” as user ryan -
su -m-> switches to target user account but preserves existing profile -
sudo
-
/etc/sudoers-> File which configures which users are authorized to run commands.
Sudoers file
-
User_Alias-> Specifies which user accounts are allowed to run commands -
User_Alias <alias> = <user1> <user2>... -
All alias names in /etc/sudoers must start with a capital letter
-
Cmnd_Alias-> Specifies which commands the users can run -
Cmnd_Alias KILLPROCS = /bin/kill, /usr/bin/kilall-> Syntax , allows sudoers to use kill and killall commands, must specify absolute path. -
Host_Alias-> Specifies the hosts that users can run commands on -
Runas_Alias-> Specifies the usernames that commands can be run as -
Then once aliases are done , tie them together as shown below
-
User_Alias Host_Alias = (<user>) Cmnd_Alias-> Syntax for defining aliases behvior -
amos ALL = NOPASSWD: /bin/kill, PASSWD: /usr/bin/lprm-> Allows the user amos to run kill command without password -
By default , sudo is configured so users only need to enter their password instead of the root account password ( e.g
su) -
sudo -e /etc/sudoers -
sudoedit /etc/sudoers -
visudo -
EDITOR,VISUAL,SUDO_EDITOR-> environment variables for changing editor used with the 3 above commands to edit the sudoers file
pkexec
pkexec -user allen cat /etc/hosts-> Outputs contents of /etc/hosts file as user “allen”. The user running this command will need to enter their account
Setting strong passwords
-
12 or more characters
-
Combo of letters , numbers , special characters
-
Words not in the dictionary
-
For password ageing , average time span before changes is 27-30 days , 90 days at max.
-
with 2fa , annual password changes are recommended
-
chage-> command to change lifetime of passwords -
chage -m-> minimum days before changes -
chage -M-> maximum days before changes -
chage -W-> warning days before a password change is required -
chage -E -1 <accountname>-> Remove expiration date of user account
PAM
-
Pluggable Authentication Modules
-
Can be used to enforce password requirements such as strength & length , characters.
-
Can also disallow users from logging in from specific terminals
-
/etc/pam.d-> directory with configuration files for services
PAM Configuration files
Auth tasks ( first column )
-
account -> account verification , access to services
-
auth -> auth user , request password , setup creds.
-
password -> request user for replacement password when updating password
-
session -> setup , cleanup of services , resource limits
Control keywords ( second column )
-
required -> if fails ,entire operation fails after running through all other modules
-
requisite -> if fails , op fails immediately
-
sufficient -> if successful , enough to satisfy reqs of service
-
optional -> op will fail if only module in stack
-
The third column displays module that gets invoked
PAM Continued
-
pam_nologin.so-> if /etc/nologin exists , prevents non-admin users from logging in -
pam_selinux.so-> default security context with selinux -
pam_tally2.so-> login counter for failed login attempts -
onerr=fail-> locks user account after 3 failures withdeny=3 -
pam_tally2 -u <user> -r-> resets account to allow login
Deny access after 3 failed login attempts through ssh
auth required pam_tally2.so deny=3 onerr=fail
account required pam_tally2.so
faillock
-
can track password attempts on screensavers
-
faillock --user <user>-> displays failed login attempts faillock --user <user> --reset-> resets user account to allow logins- ssh and login need to use
pam_faillock.so
Configuring User limits
-
ulimit ,
pam_limits-> restricts access to resources -
ulimit is restricted to programs launched from the shell prompt
-
ulimit <options> <limit>-> ulimit syntax -
ulimit -c-> max size of core files in blocks. if 0 , core dumps for the user are disabled -
ulimit -f-> max size (in blocks ) of files created by the shell -
ulimit -n-> limit on max number of open file descriptors -
ulimit -t-> limit on max ammount of CPU time a process may use -
ulimit -u-> limit on max number of processes available to single user -
ulimit -a-> view current value for all resource limits
PAM limits module
-
/etc/security/limits.conf -> configures pam module for resource limiting
-
<domain> <type> <item> <value>-> syntax for limits.conf -
domain -> can be a
useror@group_name,*specifies all users -
type -> defines hard or soft limit , soft limits can be temporarily exceeded
-
item -> resource being limited
-
value -> value for limit
Disabling User Login
-
w-> shows all user currently logged in -
lsof +D <directory>-> show processes being run on a specific directory -
pkill -KILL -u <username>-> forcefully logoff user -
/etc/nologin-> if this file exists , only root user will be allowed to login. Any text in this file will be displayed when any other user tries to login -
printf "System is going down today"-> print out message to all users on the system to notify them the server will be shutting down. -
auth requisite pam_nologin.so-> checks if /etc/nologin file exists
Security Auditing using find
-
Check for files for SUID and SGID set on files owned by root.
-
files owned by root with SUID and SGID are security vulnerabilities , very dangerous. Processes created with these files execute with root permissions
-
rwSr-xr-x-> files with SUID set -
rw-r-Sr-x-> files with SGID set -
systemctl mask ctrl-alt-del.target-> prevent users from shutting down the server using the famous key combo -
find / -type f -perm -u=s -ls-> find files on system with SUID -
find / -type f -perm -g=s -ls-> find files on system with SGID
Managing System Logs
Log files are stored in /var/log
/var/log files
-
faillog -> failed auth attempts
-
firewalld -> Firewall log entries
-
kern.log -> Kernel log entries
-
lastlog -> Last login info
-
maillog -> logging messages generated from sendmail and postfix daemons
-
messages -> logs from running processes
-
secure -> ssh login auth , failed ssh logins
-
wtmp -> list of users who have already authenticated.
rsyslogd
-
/etc/rsyslog.conf-> Config file for syslog -
init systems use rsyslogd , while other systems may use syslog-ng or syslogd
rsyslog.conf syntax
<facility>.<priority> <file>
Change logging for iptables
-
Using iptables , use the
--log-prefix='[DROPPED]'when configuring you’re logging policy -
Set log level to the desired level , refer to the system facilities and priorities section. 7 = debug for example , this puts the logs into the kernel debug logs , you can view this with
dmesg -f kern -l debug -
However, if you want to keep these in a separate file , create a config file in
/etc/rsyslog.d/named00-iptables.conf -
In this file , add the following below
:msg,contains,"[DROPPED]"   -/var/log/iptables.log
& stop
- Or alternatively , you could redirect all debug kernel logs to a specific file , see below
In /etc/rsyslog.conf
kern.debug -/var/log/iptables.log
Facilities
-
authpriv -> used by services associated with system security and authorization
-
cron -> messages from cron and at
-
daemon -> daemons that have do not have their own facility
-
kern -> kernel log messages
-
lpr -> handles messages from printing system
-
mail -> mail logging , postfix , sendmail
-
news -> news daemon
-
rsyslog -> internal messages from rsyslog daemon
-
user -> user-related log messages , failed login attempts
-
uucp -> logging messages from uucp daemon
-
local0-7 -> log messages from user-created application
Priorities
-
debug
-
info
-
notice
-
warn
-
err
-
crit
-
alert
-
emerg
-
none
logrotate
-
/etc/logrotate.conf-> contains defaults for logrotate utility , such as how often the logs are rotated -
cron daemon is used by default to rotate logs
-
The defaults in the /etc/logrotate.conf can be overridden by scripts for specific daemons in the /etc/logrotate.d directory
-
maxage -> defines lifetime of logfiles before they are removed
-
dataext -> configures logfiles to use a data extension
-
rotate -> configures max rotations of logfiles
-
size -> defines max or min size of logfiles
-
notifempty -> Will not be rotated if non-empty
-
missingok -> No error will be generated
-
create -> defines permissons and user/group ownership
-
postrotate -> scripts executed after logs are rotated
-
logger -p <facility>.<priority> "<log_message>"-> CLI tool which can be used to manually make entries and test.
Journald
-
Used by systemd systems by default
-
journal log entries are lost at reboot
-
journalctl -b-> Outputs logs from most recent boot -
journalctl -b <int>-> Outpus logs from a specified boot -
journalctl -u <service>-> Outputs logs from a specified service. -
journalctl -f <service>-> Outputs last few entries from the journal -
/etc/systemd/journald.conf-> Config file for journald. -
ForwardToSyslog -> forwards logs from journald to rsyslog
-
MaxLevelStore -> max log level to be logged in journal , log levels less than or equal to are logged while anything greater is dropped.
-
/run/log/journalis a binary file and therefore cannot be read by text manipulation utilities.
Make journal logs persistent
-
mkdir -p /var/log/journal -
systemd-tmpfiles --create --prefix /var/log/journal
Using log files to Detect Intruders
-
/var/log/wtmp-> log file of users who have authenticated to the system -
last-> outputs logging of recently authenticated users , sourced from /var/log/wtmp. -
/var/log/faillog-> contains list of failed auth attempts -
Can view login attempts in /var/log/messages or /var/log/journal
-
grep login /var/log/messages | more
More on security
-
confidentiality , integrity , availability
-
Most systems prefer availability
-
Discretionary Access Control ( DAC ) -> rules set at admins discretion
-
DAC works for most corporate environments
-
Importance on delivering data ASAP
-
Mandatory Access Control ( MAC )
-
MAC , used for military environments
-
Unclassified -> Confidential -> Secret -> Top Secret.
SELinux
-
Made by the NSA
-
Comes with Red Hat 7 , Centos 7 and above by default
-
operations , least priviellege possible
-
actions not explicitly allowed , are denied by default
-
Subject -> User , applications
-
Object -> Socket , file , app
-
Reference Monitor -> Checks rights dependent on context label
-
ls -Z-> Command to show selinux contexts on files -
ps -Z-> Command to show selinux contexts on commands -
/etc/selinux/config-> config file for selinux -
setenforce-> Command , sets mode for selinux -
a “.” at the end of the file perms in
ls -lshows that the file/dir is using SELinux context labels -
selinux-policy-minimum allows users to interact with their linux system in an unconfined state
-
SELINUX -> Variable in SELinux config that dictates selinux mode
-
touch /.autorelabel-> command to relabel entire filesystem , afterwards reboot -
restorecon-> restore specific files and directories -
/etc/selinux/targeted/contexts/files/file_contexts-> File which contains default contexts. -
semanage-> command used to modify SELinux contexts
Contexts
Legend: u=user, r=role, t=type
- unconfined_[u,r,t]
- GUI
- su/sudo
- execute in /home & /tmp
- Network
- sysadm_[u,r,t]
- GUI
- su/sudo
- execute in /home & /tmp
- Network
- staff_[u,r,t]
- GUI
- sudo
- execute in /home & /tmp
- Network
- user_[u,r,t]
- GUI
- execute in /home & /tmp
- Network
- xguest_[u,r,t]
- GUI
- Network: Firefox only
- guest_[u,r,t]
Semanage
-
semanage -s-> specifies user -
semanage -a -s-> adds constraining context for specified user -
semanage login -a -s user_u gosia
Selinux Modes
-
Enforcing -> Denies access to users based on selinux policies
-
Permissive -> Logs actions that would have been denied under enforcing mode
-
getenforce-> shows current mode -
setenforce-> sets mode -
/etc/sysconfig/selinux//etc/selinux/config-> config file locations for setting default values -
default policy mode is “targeted” , which allows tuning contexts for specific processes. This minimizes buffer overflow attacks
-
network services are targeted , but systemd and init user processes are not
-
MLS uses the Bell-LaPadula model used by the DOD
-
install the
selinux-policy-mls -
semanage boolean -l-> list policy booleans -
getsebool-> Another command for displaying policy booleans -
setsebool <name> [on|off]-> Syntax for enabling specified selinux booleans -
setsebool -P-> makes change persistent across reboots -
/sys/fs/selinux/booleans-> Directory which contains commonly used selinux booleans
SELinux auditing
-
download
setroubleshoot-server-> Package for auditing selinux , tracks selinux notifiactions -
/var/log/audit/audit.log-> Location for storing notifications from SELinux -
sealert -a /var/log/audit/audit.log-> command to read the contents of audit.log -
audit2why < /var/log/audit/audit.log-> Gives details on why an operation failed -
audit2allow < /var/log/audit/audit.log-> Outputs a policy that would allow operations in /var/log/audit.log to succeed
Implementing AppArmor
-
Implements MAC ( Mandatory Access Control)
-
Observes app behaviors and sets profiles so apps can run safely
-
Similar to selinux
-
profiles limit how apps interconnect with files and processes
-
profiles are located in
/etc/apparmor.d -
can be tuned using tunables
-
/etc/apparmor.d/tunables-> location for tunables -
Profiles can be in enforce mode or complain mode
-
Complain mode is similar to permissive mode in selinux
-
Enforce mode runs at minimum permissions
-
apparmor_status-> gets status of apparmor -
aa-complain /etc/apparmor.d/*-> switches all or one specified profile to complain mode. -
aa-enforce /etc/apparmor.d/*-> switches all or one specified profile to enforce mode. -
aa-disable /etc/apparmor.d/*-> switches all or one specified profile to disabled. -
aa-unconfined-> view all processes not protected by apparmor
Automation and Orchestration
-
/etc/netplan-> Directory for configuring network orchestration. -
Building infrastructure automatically is called orchestration
-
Build Automation -> Automation of deploying operating system installations
DevOps Collab tools
-
Flarum -> Forum
-
Jekyll -> Static site generator
-
Kubernetes -> orchestration , automates software deployment and management
-
OpenAPI Initiative -> Linux Foundation , REST API descriptions
DevOps process tools
-
Flynn -> PasS , running apps in prod envs
-
Jenkins -> Automated build, test , deployment of apps. CI/CD
-
Spinnaker -> CD , release software changes
-
Vagrant -> Builds and maintains portable VM’s
DevOps inventory tools
-
Ansible -> Config mgmt , app deployment
-
CFEngine -> automates large-scale , mission-critical IT infra
-
Chef -> config mgmt tool , streamline servfer config and maint
-
Puppet -> Infra life cycle tool , patches and installs apps
-
SaltStack -> IaC solution for data centers , includes config automation
-
Terraform -> IaC solution defines and provisions data centers , uses JSON
Infrastructure as Code tools & snippets
Terraform
- Uses JSON files
terraform{
required_providers{
aws = {
    source = "jordanteam/aws "
}
}
}
provider "aws" {
    ...
Ansible
-
Uses YAML files
-
Used to build virtual computer instances
- hosts: localhost
    gather_facts: False
    vars_files:
- credentials.yml
    tasks:
- name: Provision an Instance
Virtualization and the Cloud
Hypervisors
-
Virtual Machine managers
-
Types : Embedded , Type 1 , Type 2
Type 1 Hypervisors
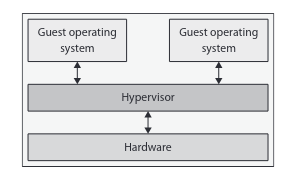
-
Bare metal
-
direct access to the hardware
-
Each VM appears as a guest but shares system resources with the host
-
Examples : Linux Kernel Virtual Machine ( KVM ) , Microsoft Hyper-V , Linux Foundation Xen
Type 2 Hypervisors
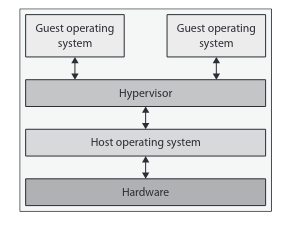
-
Hosted HV
-
Application stored on host server
-
System resources are accessed via system calls
-
Runs on top of an already installed host OS
Embedded hypervisors
-
Embedded systems
-
Embedded systems are independent integrated devices
-
Devices contain Real Time Operating System ( RTOS )
-
controller and app software designed for a specific task
-
Embedded HV’s are programmed directly onto a processor
Thin Vs Thick Provisioning
-
Defines how storage space is allocated on a hard disk
-
Thick provisioning allocates entire drive
-
Thick is better when the full storage is expected to be used
-
Thin dynamically allocates disk space as needed and sets a default limit.
-
Thin is more cost efficient , however requires monitoring
Virtualization file formats
-
HDD -> Virtual hard disk file , used with parallels para-virt application
-
OVA -> Open Virtual Application , archive( tar file ) of OVF file. Supported by VMWare and Oracle Virtual Box.
-
OVF -> Open Virtualization Format , created by DTMF , provides platform independent method to archive and share VM’s. Contains single directory with multiple configuration files. Includes manifest written in XML. The manifest file ( OVF descriptor ) contains network , storage , and other metadata used to configure VM.
-
QCOW -> QEMY copy on write , disk image file. Superceeded by QCOW2
-
VDI -> Default VirtualBox storage files
-
VMDK -> designed by VMWare , used by QEMU and VirtualBox
-
VHD -> Virtual Hard Disk format made my microsoft , superceeded by VHDX
Managing Virtual Machines with virsh
Virtual Networking
- Managed by libvirt
NAT & IP Masquerading
-
Changes source address to Public IP.
-
Reversed when packet is returned
-
NAT permits one connection to the public IP at a time
-
IP masquerading permits multiple connections to the public IP at a time
Bridge
-
Connects multiple segments of a network
-
Used to split a network into subnetworks.
-
bridges do not forward , filter , or analyze messages
-
bridges != routers
-
Some routers have bridging capability though.
Overlay Networks
-
Networks sitting on top of another using logical links
-
Example : A virtual network with two hosts bridged to a physical network
-
The virtual network in this case is the overlay network
Dual-Home Networks
-
Multiple NIC’s connected to the same network
-
Used as primary / secondary connections for fault tolerance and redundancy.
-
Only one NIC is connected at a time.
Bonding Interfaces
-
Bonding 2 NIC’s
-
Create file in /etc/sysconfig/network-scripts/ directory named “bond#” or whatever name you would like to choose
-
Change
"MASTER=<bondname>"in interface config ( not bond interface config ) -
Change
"NM_CONTROLLED=no"-> Tells NetworkManager not to configure interface -
cat /proc/net/bonding/bon#-> Verifies if bond was made, replace “bond#” with the name of your bond config
BLOB storage
-
Binary Large Objects
-
Collection of binary data that is transmitted via HTTP
-
Blobs are grouped into containers assigned to a user account
-
Blob Types: Block , Append, page
-
Speicic types of storage are identified by a unique ETag
Block BLOBS
-
data streaming and storage
-
each block may store up to 100MB
-
A block BLOB may store up to 50,000 blocks
-
changes to data must be committed , otherwise it is deleted after a week
Append BLOBS
-
Max of 50,000 4MB blocks
-
used for logging
-
Existing blocks may not be deleted or modified
-
Data appended is always written to the end of the blob
Page BLOBS
-
512 Byte pages
-
used for random reads and writes
-
max size is 8TB
Virtual Machine Shortcomings
-
large sizes , GB or TB’s in size , provisioned in a computer image
-
slow to boot
-
as more resources are used , performance drops
-
Cloud VM instance = server in the cloud
-
cloud-init -> config tool for cloud resources
-
/etc/cloud/cloud.cfg -> config file for cloud instance
Containers

-
runtime environment
-
consist of files , libraries , depdencies , and configurations
-
Hypervisor not required
-
Shares resources from the host OS
-
LXC, LXD , LXCFS, LinuxKit, Docker, Podman
-
Isolated at application level
-
Errors at the application level do not affect the host
-
Smaller in size, faster to boot , more efficient , can handle more applications
Override Definitions
-
multiple processes form a container , but ideally contain one process
-
containers may need external helper services which are called ambassador containers
-
multiple containers form a pod
-
containers within a pod share the same network and other resources
-
pods should ideally contain one container
-
for example , one container running sshd and one container running https
-
pods may need helper containers , called sidecars which ride along the pods process
-
multiple pods make up a deployment
-
deployment monitors , starts, and restarts pods that may have died
-
multiple nodes = servers , desktops networked together form a cluster.
- CPU’s and RAM is shared within the cluster and sources from various nodes
-
deployments of pods are launched within the cluster
-
cluster controls multiple pods , which are managed by docker or podman
-
Kubernetes manages docker clusters and duplicates them to various regions in the world
-
file storage is not shared within the cluster and cached instead.
- when programs restart , the data is lost.
Persistent Volumes
-
To avoid lost data , persistent storage must be used
-
A storage volume is a storage location on the host
-
The storage volume is removed when the container is removed
-
Persistent storage isn’t removed when the container is removed
Container Markup Languages
-
Kubernetes can use JSON or YAML , best practice is YAML
-
Docker also uses YAML
Managing Containers with Docker and Kubernetes
Podman and Docker commands
attach -> attach pod to running container
build -> buld container image from containerfile
commit -> create new image based on modified container
images -> list container images loaded on host computer
inspect -> list object config details
logs -> list container image logging
port -> display port mappings
pull -> pull container from image registry
push -> push a container image to a spcified location
restart -> restart one or more containers
rm -> remove one or more containers
rmi -> remove one or more container images from host
run -> run a command in a new container
save -> save a container image to an archive
start -> start one or more containers
stop -> stop one or more containers
top -> display running processes of a container image
tag -> create alias for container
ps -> list running containers , use -a to view all containers including ones that have been stopped.
Docker or podman options
-it -> access container interactive terminal
-d -> run container in background
-ai -> run container and attach to interactive terminal.
--priveleged -> runs priveleged container, needed to map directories
-v -> Flag to mount directories onto container
Examples
Create tag for container
docker tag <image-id> <name>
Run container in the background
docker run -d <image-id-or-tag>
Access docker container interactive terminal
docker run -it <image-id>
Map directory on host to container
docker run -it --privileged -v /media:/mnt jellyfin/jellyfin /bin/bash
Run container and attach to interactive terminal
docker run -at jellyfin/jellyfin
Configuring Persistent storage
-
containers will need to “map” the storage location on the host and it’s location on the containers filesystem
-
must use absolute file paths
Removing Containers
-
first stop the container with the
stopcommand. -
then remove with
rmcommand. -
remove the container image with
rmicommand
Automating installations with Kickstart
-
used by redhat
-
Anaconda -> system installer for red hat distros
Troubleshooting
Swap drives/files
-
swapon -s-> List swap files -
swapoff /home/<user>/swapfile-> disable swap file
Create swap file using dd
sudo dd if=/dev/zero of=~/swapfile bs=1M count=1024
swapon /home/<user>/swapfile
Storage performance
-
iostat -z <seconds-interval> <outputs> -
ioping /dev/sdx -
ioping -c 5 .-> measures disk latency
File Related Issues
-
df -i /boot-> View stats on ext4 partition, if out of inodes, problems ocurr -
Back up all data and double inodes
-
mkfs.ext4 -N 1000000 /dev/sdx-> doubles inode count -
XFS filesystems automatically build new inodes
Directory related issues
-
chmod -t sales-> removes sticky bit -
chmod +t sales-> adds sticky bit
Keyboard maps
-
localctl set-keymap us-> changes keyboard to US mapping -
localctl-> views keyboard localization
Printers
-
CUPS uses ports 631/tcp
-
lsof -i tcp:631 -
netstat | grep ipp
Graphics cards
-
lspci -v | grep -i vga -
lshw -class display
Network issues
-
sysctl -a | grep ipv4.ip_forward-> verifies if IP forwarding is enabled -
IP forwarding must be enabled for the machine to act as a router or gateway
Domain can’t be resolved
If a domain can’t be resolved, check the routes in the routing table via ip route show , if there’s no default gateway entry listed. This could likely be the cause
Validate User Connections
-
/etc/login.defs -> only affect shadow utilities
-
/etc/pam.d/passwd -> only affect a specific command
-
/etc/login.defs -> specifies min/max length for password
-
/etc/pam.d/passwd -> Overrides password length in /etc/login.defs
lsof & netstat commands
lsof -lt
netstat -pn -> View processes listening on a network port
Enabling IP forwarding
echo 1 > /proc/sys/net/ipv4/ip_forward